If you have been in the loc community for any amount of time, you have heard the word interlocking.
Then someone else in the same group said it destroyed their locs completely. Now you are confused and honestly that confusion is completely valid. Interlocking is one of those topics that comes with very strong opinions on both sides.
Before we get into all of it, let us make sure you have a solid foundation first. If you are still figuring out which hair type works best for your protective styles, go read my post on what type of hair is used for soft locs and how to choose. Understanding your hair deeply makes every maintenance decision so much clearer. Now let us break down interlocking from the very beginning so you can make a truly informed decision.
What Is Interlocking Exactly
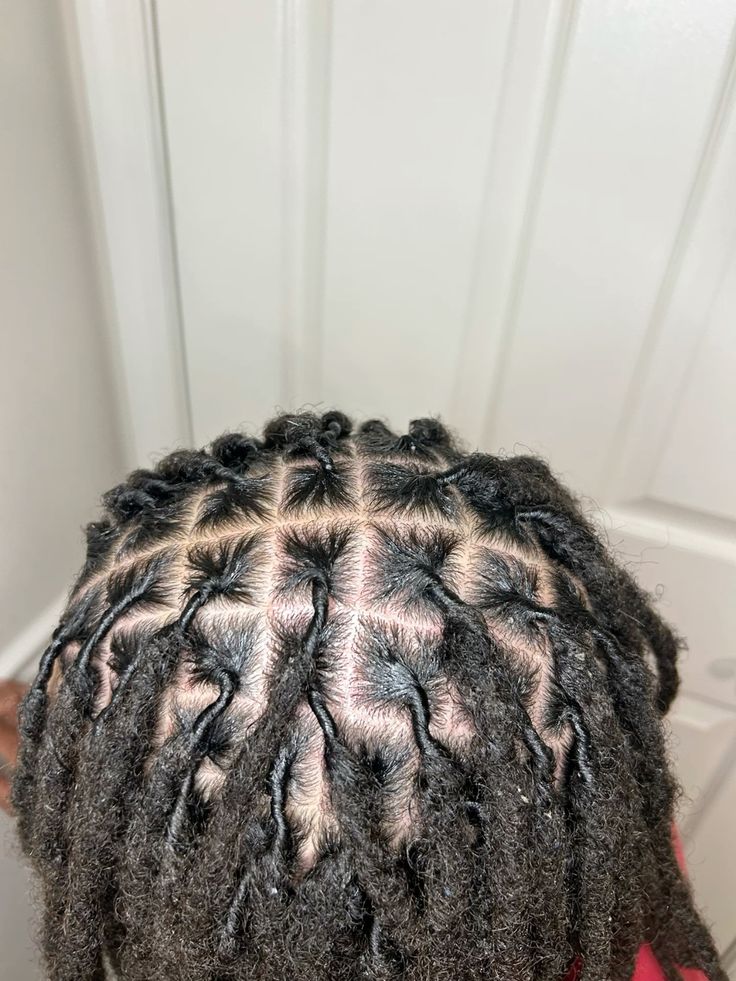
Interlocking is a loc maintenance method that secures new growth at the root of each loc. It does this by pulling the body of the loc through the new growth in a specific pattern.
The result is a knot at the root that holds new growth in place. Importantly, this happens without any twisting motion at all. This is fundamentally different from retwisting.
Retwisting smooths new growth into a coil from the outside of the hair. Interlocking works from the inside out instead. It creates an actual physical knot within the hair itself.
Bookmark this for later: What no one tells you about getting starter locs for the first time
The Basic Mechanics of Interlocking
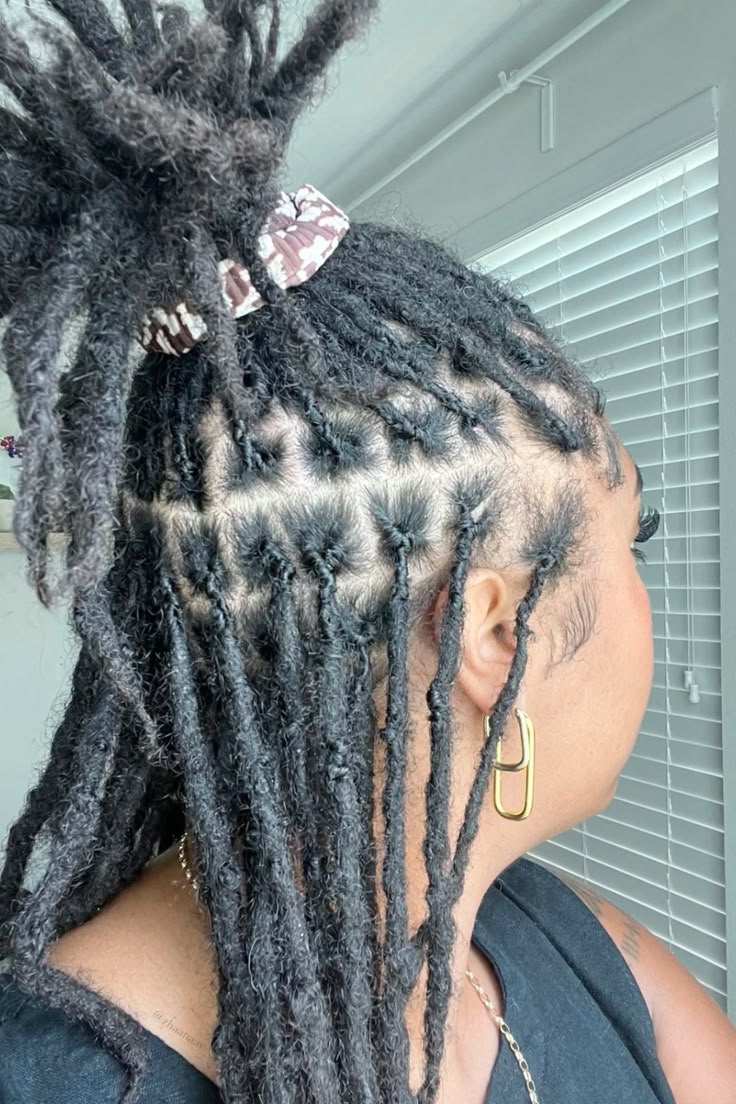
Picture the root of your loc as a loop of new growth sitting at your scalp. Interlocking involves taking the body of your loc and threading it through that loop.
You use a specific tool to do this threading carefully and precisely. Each time you thread the loc through, you rotate the direction slightly before threading again.
This rotation pattern creates a series of interlocked knots at the root. These knots grip the hair permanently rather than temporarily. The result is a root that stays locked regardless of washing, sweating, or physical activity.
Save this for your loc journey: Micro Locs vs Traditional Locs: Which Is Right for You?
Why People Choose Interlocking Over Retwisting
People choose interlocking for many different reasons. One of the most common reasons is longevity.
An interlocked root holds significantly longer between maintenance sessions than a retwisted root. Additionally, interlocked roots hold up much better when wet.
This is a major advantage for people who wash their locs frequently. It also suits people who are very physically active in their daily lives.
Furthermore, interlocking works well for people whose hair type does not hold a retwist easily. If your hair consistently unravels after retwisting, interlocking offers a much more secure alternative.
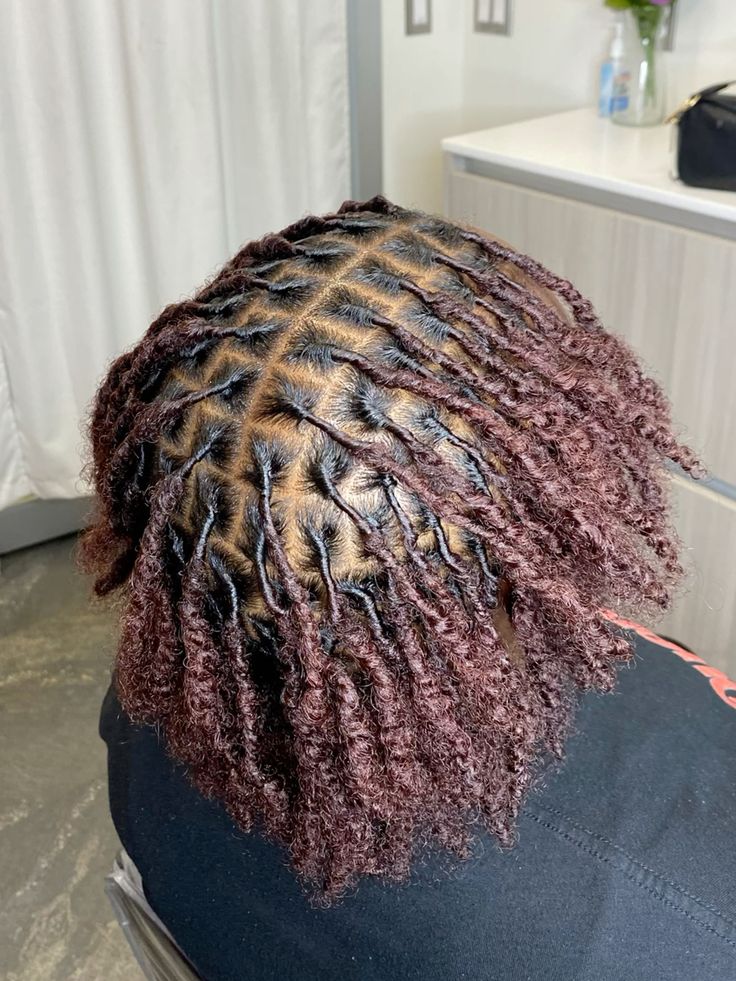
The Different Interlocking Patterns
One thing that makes interlocking more complex than retwisting is that there are several different patterns. Each pattern creates a different kind of knot at the root.
Each one also suits different hair types and loc sizes. Understanding the patterns before you start prevents you from choosing the wrong one for your situation.
Come back to this when you need it: Can You Really Start Locs on Short Hair?
The Two Point Pattern
The two point pattern involves threading the loc through the new growth in two alternating directions. You thread north to south on the first pass.
Then you thread east to west on the second pass. This creates a simple cross pattern at the root that is gentle and easy to learn. The two point pattern is generally recommended for finer or thinner locs.
It creates a secure knot without putting excessive stress on delicate hair. It is also a great starting pattern for beginners who are still building their confidence and technique.
The Four Point Pattern
The four point pattern involves threading the loc through the new growth in four directions. You work through north, south, east, and west in sequence.
This creates a more complex and tighter knot at the root than the two point pattern. The four point pattern is generally better suited to thicker locs and coarser hair textures.
The additional threading creates more grip and security for those hair types. However, it also puts more stress on the hair at the root.
Therefore, tension control is especially important when using the four point pattern consistently.
Keep this guide handy: Everything You Need to Know About Getting Locs as a Man
The Three Point Pattern
The three point pattern sits between the two and four point patterns in complexity. It involves threading in three directions rather than two or four.
Some people find this pattern offers a good balance between security and gentleness. However, the three point pattern is less commonly used than the other two options.
Consequently, it can be harder to find clear guidance and tutorials on this specific pattern online.
You’ll want to revisit this: My Honest Review of Going From Relaxed Hair to Locs
The Tools You Need for Interlocking
Unlike retwisting, interlocking requires a specific tool to thread the loc through the new growth.
Having the right tool makes the process both easier and significantly safer for your hair.
The Interlocking Tool or Latch Hook
The most commonly used interlocking tool is a small hook device.
To use it, you insert the hook through the new growth at the root. You then latch the body of the loc onto the hook.
Finally, you pull the loc back through the new growth carefully. The latching mechanism prevents the hook from snagging the hair as it passes through.
My post on how to use a crochet needle to maintain and repair your locs goes into much more detail about using hook tools for loc maintenance.

Rat Tail Comb as an Alternative
Some experienced loc wearers use the pointed end of a rat tail comb to assist with interlocking. This approach requires more skill and practice to execute safely.
The pointed end of a comb does not have the latching mechanism of a dedicated tool. Therefore, it is easier to accidentally snag or pull at the hair during the process.
As a beginner, starting with a dedicated interlocking tool is strongly recommended over using a rat tail comb.
Tension Clips for Sectioning
Tension clips are not directly involved in the interlocking process itself. However, they are very useful for keeping your hair organized during a self interlocking session.
Working through your entire head in an organized way prevents you from missing locs. It also prevents you from accidentally interlocking the same loc twice.
Both mistakes are easy to make without a clear system for tracking your progress.
How to Interlock Your Locs Step by Step
Now let us get into the actual process. Following these steps carefully gives you the best chance of a safe and effective interlocking session.
This applies whether you are doing it yourself or watching a professional so you know what to expect.
Step One: Start With Clean, Dry Locs
Interlocking should always be done on clean locs. Buildup and product residue at the roots can make the process harder. It can also get locked permanently into the knot you are creating at the root.
Once something is locked inside an interlocked root, it is very difficult to remove. Starting with clean locs ensures that only your hair gets locked in.
If your locs need a thorough clean before your session, go read my post on how to do a deep cleanse for locs step by step first. Some people prefer to interlock on slightly damp locs.
The hair is more pliable and easier to work with when it has a little moisture. However, very wet hair is more fragile and prone to breakage during manipulation. So aim for lightly damp rather than soaking wet.
Step Two: Section Your Hair Systematically
Before you begin interlocking, divide your hair into sections using your tension clips. A common approach is to divide the hair into four quadrants.
Start at the back of your head and work forward. Starting at the back ensures the most difficult area gets your freshest attention.
As you complete each loc, clip it out of your way. This gives you a clear view of the loc you are currently working on at all times.
Step Three: Identify the Root of Each Loc Clearly
Before you interlock any loc, clearly identify where the root sits at your scalp. Look at the parting lines around each loc carefully.
Make sure you understand exactly which hair belongs to that loc. Also confirm which hair belongs to neighboring locs on all sides. This step prevents one of the most damaging interlocking mistakes.
That mistake is accidentally interlocking hair from a neighboring loc into the root you are working on.
When neighboring locs become interlocked together at the root, separating them later causes significant damage. It sometimes causes complete breakage of the affected locs.
Step Four: Insert Your Tool and Thread the Loc
Insert your interlocking tool through the new growth at the base of the loc. The tool should pass cleanly through the center of the new growth.
It should not snag or catch at the sides during insertion. Latch the body of your loc onto the hook of your tool. Then gently and slowly pull the loc back through the new growth.
Use slow, controlled movements rather than fast or forceful ones. The goal is a smooth, clean pass that creates a neat knot without any pulling or snagging at all.
Step Five: Rotate and Repeat According to Your Pattern
After your first threading pass, rotate the direction of your tool. Follow whichever interlocking pattern you have chosen for your hair type.
Complete all the passes required by your chosen pattern before moving to the next loc. After completing all the passes, gently tug the loc downward to snug the knot close to the scalp.
The knot should sit close to the scalp but not cause any tension or discomfort. If you feel any pulling at your scalp after snugging the knot, it is too tight. Loosen it slightly before moving on to the next loc.
Step Six: Work Through Your Entire Head Consistently
Continue working through your entire head systematically. Move section by section and quadrant by quadrant throughout the session.
Try to maintain consistent technique and consistent tension throughout. Inconsistent technique creates an uneven finished result that becomes more noticeable over time.
Take breaks as needed to rest your hands and maintain your focus. Interlocking a full head of locs takes considerable time and energy.
Rushing through the later locs because you are tired is a very common cause of technique errors and damage.
How Often Should You Interlock Your Locs
One of the biggest advantages of interlocking is that it does not need to be done as frequently as retwisting.
However, many people make the mistake of interlocking too often. They do it out of habit or anxiety about their roots looking untidy between sessions.
The Right Interlocking Frequency for Your Hair
Most loc wearers who interlock find that every six to eight weeks is sufficient. Some people with slower growing hair go even longer between sessions.
Going longer between sessions is generally safer than going shorter. New growth that develops for longer before interlocking creates a more substantial knot. That knot holds up much better over time as a result.
Interlocking too frequently is one of the most significant risks with this method. When you interlock before there is sufficient new growth to work with, problems arise.
You end up threading the tool through hair that has already been interlocked previously. This creates excessive stress on the same section of hair repeatedly.
It is one of the primary causes of thinning and breakage at the roots. My post on why your locs are not locking and what to do about it covers how maintenance frequency affects the overall locking process in really helpful detail.
The Risks of Interlocking Done Incorrectly
Interlocking is a powerful maintenance method but it does come with specific risks. These risks arise when it is done incorrectly, too frequently, or with poor technique.
Understanding these risks helps you avoid the mistakes that give interlocking a bad reputation.
Thinning at the Root
Root thinning is the most commonly cited risk associated with interlocking. It happens when interlocking is done too frequently.
It also happens when too much tension is applied during the process. Using the wrong pattern for your particular hair type also contributes to this problem.
When the root of a loc becomes too thin from repeated stress, it can eventually break entirely. The loc is then lost completely and cannot be recovered.
Choosing the right pattern, maintaining appropriate tension, and spacing your sessions correctly prevents this outcome.
My post on how to fix locs that are too thin, too thick, or uneven is a really valuable read if you are already noticing thinning at your interlocked roots.
Locs Growing Together at the Roots
Another common risk is neighboring locs growing together at the roots. This happens when sessions are spaced too far apart.
It also happens when the interlocking pattern is not precise enough during the session. When two locs share interlocked roots, separating them requires very careful and gentle work.
Forcing them apart quickly causes breakage at the root. Always check the bases of your locs at every session. Gently separate any locs that have begun growing together before you proceed with interlocking.
Irreversible Knots
Interlocking creates permanent knots in the hair by design. This is what makes it so effective and long lasting as a maintenance method.
However, it also means that mistakes made during interlocking cannot easily be undone. A retwist can be undone and redone relatively easily.
An incorrect interlock cannot. If you accidentally interlock neighboring hair into a loc, correcting this requires very careful and sometimes professional intervention.
This is why taking your time and learning the correct technique before starting is so critically important for beginners.
Interlocking vs Retwisting: Which Is Right for You
This is the question that brings most people to this topic in the first place. The honest answer is that neither method is universally better than the other.
The right choice depends entirely on your specific hair, your lifestyle, and your maintenance preferences.
Choose Interlocking If
Interlocking tends to be the better choice if your hair type does not hold a retwist well. It also suits people who are very active and need their locs to hold up through frequent washing.
Furthermore, interlocking suits people who prefer longer intervals between maintenance sessions. If you travel frequently or have a very busy lifestyle, interlocking gives you more freedom between appointments.
Your roots can go longer without looking neglected when you use interlocking consistently.
Choose Retwisting If
Retwisting tends to be the better choice if you have fine or thin locs. Those locs may be more vulnerable to the stress of interlocking over time.
It also suits people who are in the very early stages of their loc journey. Very new locs may not yet be established enough for interlocking to work effectively.
Additionally, retwisting is generally more forgiving of technique errors than interlocking is. For beginners just starting their journey, beginning with retwisting and transitioning to interlocking later is a perfectly reasonable approach.
My post on the stages of locs explained from baby to fully mature will help you understand exactly when your locs might be ready for that transition.
Self Interlocking vs Professional Interlocking
Many people wonder whether they can safely interlock their own locs at home. The honest answer is that self interlocking is absolutely achievable with practice and patience over time.
Learning to Interlock Yourself
Self interlocking is a skill that develops over multiple sessions. Your first few sessions will almost certainly be slower and less consistent than later ones.
Starting with the locs at the front and sides of your head helps you build confidence first. These areas offer the clearest visibility for learning your technique.
Use a handheld mirror combined with a wall mirror for visibility of the back sections. This combination gives you much better visibility than a single mirror alone provides.
When to See a Professional Instead
There are certain situations where seeing a professional loctician is genuinely the better choice. If you have very fine or thin locs already showing signs of stress, professional help is important.
Experienced professional hands protect fragile locs far better than a beginner doing it at home would. Additionally, if you are transitioning from retwisting to interlocking for the first time, consider one professional session first.
Having a professional do the first session gives you a clear reference for what correctly interlocked roots should look and feel like. My post on what is a loctician and do you actually need one covers how to find a skilled professional who can handle interlocking safely and effectively.
Caring for Your Locs Between Interlocking Sessions
What you do between interlocking sessions affects how your roots look as new growth develops. It also affects how well the interlocking holds up when you eventually redo it.
Keeping Your Roots Clean and Moisturized
Clean roots between sessions prevent the buildup that makes interlocking sessions harder. Use a diluted cleanser or scalp refreshing spray to keep your scalp clean between full wash days.
Additionally, keeping your roots lightly moisturized prevents dryness and brittleness at the root. Dry, brittle hair is more vulnerable during interlocking and more likely to break.
My post on how to keep locs moisturized in dry or cold weather has moisture techniques that apply directly to root care between sessions throughout the entire year.
Protecting Your Roots at Night
Wearing a satin bonnet between interlocking sessions protects your freshly interlocked roots from friction during sleep.
Friction against cotton pillowcases pulls at interlocked roots over time. This loosens the knots before they have fully settled into place.
Sleeping on a satin pillowcase works equally well if you prefer not to wear a bonnet.
Consistent overnight protection keeps your interlocking looking neat and holding well for as long as possible between sessions.
Final Thoughts
Interlocking is a genuinely excellent loc maintenance method when done correctly. It offers longevity, security, and freedom that retwisting simply cannot match for many hair types.
However, it requires careful technique, appropriate tools, and a real commitment to learning the process properly. Take your time learning the correct pattern for your hair type.
Invest in a good quality interlocking tool. Space your sessions appropriately and never rush through the process out of impatience.
Your locs will reward that care with strong, healthy, well maintained roots that hold up beautifully through everything your lifestyle demands of them.
If you want to keep building your loc maintenance knowledge beyond interlocking, my posts on how to loc natural 4c hair and what to expect and sisterlocks vs traditional locs which is worth the investment are both excellent next reads that will deepen your understanding of your loc journey significantly.
Leave a Reply